Springerle Recipe
I got a comment from LadybugLove on my January 4 post, where I took pictures of my just-barely-post-Christmas Christmas cookies. I made holly cookies (no picture), the kind with cornflakes and melted marshmallows and little cinnamon candies, and I made Springerles.

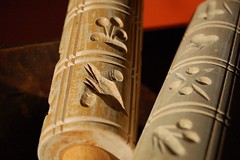
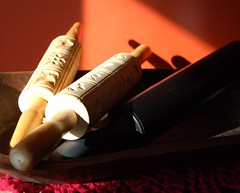
Springerles are an old family tradition for my side of the family. They are made with a fairly simple batter. Where it gets fancy is the rolling out: you roll them twice, with 2 different pins. The first is a regular rolling pin, for the regular old reason, to flatten the dough. The second, at least MINE, is a wooden rolling pin, with elaborate designs cut into it at regular intervals. It presses these shapes and patterns into the dough, and then the dough is cut into the rectangular cookies and dried overnight on cookie sheets strewn with anise seeds.
An alternative, if a baker doesn't have a springerle roll, is to use old-fashioned cookie or butter presses. Not a spritz-press! This dough is far too stiff for that type of tool, and these cookies are completely wrong for such a thick cookie shape.

Did you catch that this cookie gets dried before baking? Think of this as the German dunking cookie. It's like their version of the Italian biscotti. It's meant to have a bit of a snap to it. Think also of the types of drinks available 350 years ago. What would they have dunked a cookie in? Probably not hot chocolate. Perhaps a dark beer, very likely hard cider, definitely spiced wine, probably tea. Children would have been given the same options, as drinking the milk of "a different animal" is a fairly modern concept. I wouldn't recommend that now, but it gives you an idea of how things have changed since the advent of food storage! Actually, I think that's a part of the reason for the anise seed, in addition to the very special-ness and exoticness of the flavoring. Anyway, don't be surprised by the very tough nature of this cookie. Please experiment with the beverages you dunk it in. (Milk is not good. Cider, hot chocolate, various teas, coffee, and orange juice are all very good.)
On to the recipe!
Make sure all ingredients are at room temperature, between 65 and 78 deg. F.
Prepare the cookie sheets by first greasing them, then spread 1-2 T whole anise seeds across the surface of each cookie sheet.
Combine thoroughly, then set aside:
3 1/4 C all-purpose flour
1/4 t baking powder
Beat until color lightens:
4 large eggs
Add these next ingredients GRADUALLY to the beaten eggs until further lightened in color, and thick, creamy, with a ribbon-like texture:
1 2/3 C granulated sugar
1 t finely grated lemon zest
1 t anise extract
Use a wooden spoon to fold in the flour mixture until completely and smoothly blended. Sprinkle a clean, smooth work surface generously with flour and knead the dough until it is firm and manageable. Do not be surprized if this takes 1/2 C or more!
Once it is of a consistency that feels stiff enough to work with a rolling pin, divide into portions of a size to work with your work space. Store the reserve portions of dough wrapped in plastic or in resealable bags so they don't dry out by the time you are ready to roll them out.
Now you are ready to roll. Keep the flour handy! You will need it regularly, and do use it liberally! Roll the dough to 1/4" thickness. Dust the Springerle carved rolling pin with flour (but make sure there are no large deposits in the recesses of the designs, as it will affect the design of the cookie), and BE FIRM when pressing down this rolling pin! It is important to get a strong impression, and to have even pressure on both sides of the rolling pin.

Cut the designs apart with a very sharp knife, and arrange on your cookie sheets. I like to press very gently as I place them on the cookie sheets, so that there's no doubt the anise seeds will be pressed into the back of the cookie.

If you've ever made cookies that must be rolled out and cut, you will know that it's at this point you have to re-roll the scraps, perhaps add it to some of the as-yet unrolled-out dough. Just keep going until all the dough is rolled, pressed, cut, and placed on the cookie sheets.
Filled all the cookie sheets? Finished all the dough? DON'T BAKE THEM YET! Dry the cookies somewhere cool and dry for at least 8-12 hours. I usually let them go overnight. Do not skip this step.
When it's time to bake them, bring the cookies and cookie sheets up to room temp. Then preheat the oven to 300 degrees F.
Bake ONE SHEET AT A TIME. Seriously. It's worth it. Even though each sheet takes 18-24 minutes (I usually go for about 20-21 minutes). Peek through the oven window at the cookies as you get close to that near-done stage: what you're watching for is a firm texture, but almost no coloration, perhaps just a very gentle inkling of gold along the very edges. Nothing more than that. Remove from cookie sheets and cool on racks.
I've seen these cookies painted with diluted food coloring (this requires another few hours drying time). There's a suggestion in Joy of Cooking that edible gold leaf would be a great plan, too. Regular frosting would hide the lovely embossed designs and alter the flavor of the cookie. I just leave them as they are. They are a very pretty cookie.
I hope you'll try this! I hope it brings you much enjoyment and becomes a tradition for your family that's as cherished as it is in mine.
Labels: baking, Blog365, Christmas, coffee, family, friends, good fun, handmade, holiday, home, memory, nostalgia, recipe, sacred, warmth, winter
posted by Rebecca @ 8:28 PM
0 comments
![]()
![]()


0 Comments:
Post a Comment
<< Home